An Allsky camera is a typical “keeps running” project – until it suddenly stops doing so. In my case, it wasn’t a single defect, but a combination of long cables, voltage drops and small faults that only became noticeable after weeks or in unfavorable weather conditions.
In this article, I show why I fundamentally revised my power architecture: away from “works somehow” and towards a robust, documented solution for unattended continuous operation outdoors.
Initial situation: Working, but not optimal
My Allsky camera was basically stable, but there were still some minor anomalies – in particular, the USB connection of my ZWO ASI678MC was a bit “jerky” and cloning my system from microSD to an external SSD hard disk didn’t want to work at all.
One of the error messages was, for example:
usb X-Y: reset high-speed USB device number N using xhci-hcd
or
usb usbX-portY: over-current change
None of this was dramatic – but it is precisely such “small” effects that are a warning signal if a system is to run permanently and unattended in external operation.
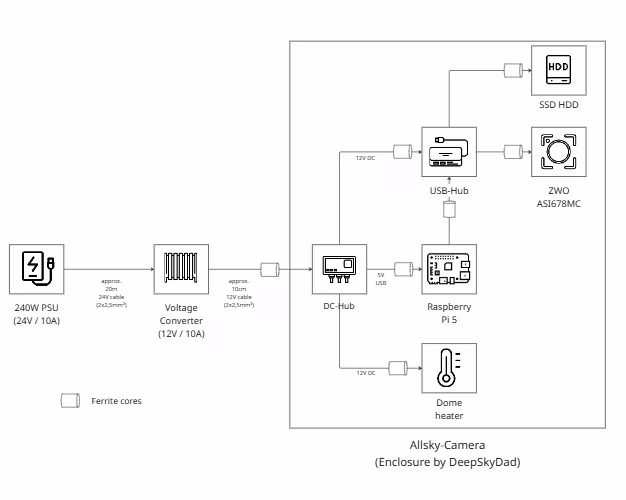
Basic principle: High voltage on the line, clean distribution on site
The most important step was to consistently rethink the power architecture. Instead of running 12 V over long distances, I now use 24 V over the entire route and convert the voltage down to 12 V directly at the camera using a DC/DC converter. This significantly reduces voltage drops, line losses are minimized and the system reacts less sensitively to load peaks.
Why the cable cross-section is crucial
One critical point was the cable cross-section. Thin cables work on paper, but quickly reach their limits in practice – especially in cold conditions or with increasing loads. Switching to a 2×2.5 mm² solid copper cable ensures stable voltages, low heating and long-term operational reliability. This is not a luxury, but a basic requirement for reliable continuous operation.
EMC fine-tuning: ferrite cores in the right places
A further step was targeted interference suppression. Ferrite cores are now located on the 12 V line after the DC/DC converter and optionally on individual consumer and USB branches. The important thing here is not the quantity, but the position: ferrites attenuate high-frequency interference where it occurs or affects sensitive components – not anywhere on the line. In DC cables, the positive and negative terminals must always be routed through the ferrite together, as this is the only way to effectively attenuate high-frequency interference. In USB cables, the ferrite must always surround the entire cable—attenuating individual wires is neither practical nor useful.
Clean voltage distribution instead of USB power supply
The DC hub from DeepSkyDad takes care of the 12 V distribution. The Raspberry Pi is deliberately no longer supplied with power via USB, but directly via a stable 5 V and 12 V source. USB is therefore used exclusively for data transmission. This separation significantly reduces interference and is one of the most effective measures against inexplicable USB resets.
Heating as a separate circuit
The dew and frost heater of the Allsky camera is connected to its own 12 V branch and is temperature-controlled. Although this results in brief load changes, these do not affect the camera or Raspberry Pi. The heating power is around 8 W and is therefore easy to control and cleanly decoupled from the rest of the system.
Why an actively powered USB hub is crucial
A central point of the optimization was the use of an actively powered USB hub. The camera and SSD are among the USB devices with the highest power consumption and are particularly sensitive to voltage fluctuations. If the hub is only powered via the Raspberry Pi, load peaks, line losses and USB instabilities add up. The separate 12 V supply of the USB hub ensures that all connected devices are supplied with sufficient and stable power at all times. USB is therefore only responsible for data transmission – a clear separation that is immediately noticeable in more reliable and reproducible operation. The hub is connected directly to the DC hub from DeepSkyDad using a DC cable.
Result: More peace of mind, more reserve, fewer surprises
The optimized cabling has not brought any new functions, but exactly the opposite: it has eliminated problems before they become visible. The system is more stable, voltages remain constant even under load and USB devices behave inconspicuously. For an all-sky camera that has to work reliably every night, this is precisely the decisive quality gain.
Scheme
All changes are documented, including wiring diagrams and current paths. This makes maintenance, troubleshooting and subsequent expansions much easier. And this is how it currently looks: